CodeLab Tutorial #1
Designing a first CodeLab module
By following this tutorial, you will develop the "HelloModule" plugin, a small and simple module to display a text from a C, Java or Python program. The rendering below is the result of the execution of the following Python program:
from HelloModule.hello import *

setFont('Times new Roman', 50)
setText('Hello World!')

The design and development of a CodeLab plugin is facilitated by a set of Java classes and tools that ensure the integration of the plugin into the CodeLab architecture. This development kit contains:
- A tree structure to prepare the development;
- Some Java classes to be inherited to write your classes;
- Some Java utility classes to facilitate certain aspects;
- Compilation and packaging scripts.
Prerequisite for this tutorial:
- Having the latest version of CodeLab installed
- Having used CodeLab as an end-user
- Mastering the object concepts and OOP in Java
- Understanding the syntax of XML files
Table of contents :
- Development tree
- Main classes of the module
- Business methods of the main class
- Writing the instruction handler
- Writing the "includes" for each target language
- [Writing four templates] (#6)
- Adding buttons to the toolbar
- Internationalization of the module
1. Development tree
To develop a new plugin, the first thing to do is to copy the plugins folder to the root of CodeLab, next to the modules one. The plugin will not compile if you are working in another location.
Go to the plugins folder, duplicate the YourModule template-tree and rename it to HelloModule. The execution of the build.sh or build.bat script (depending on your operating system) will produce a .jar file which will contain all the files and resources of your plugin. This file will be automatically copied into the modules directory of CodeLab, which will allow you to test your module during its development.
plugins/
└── YourModule/       ← Do not modify the template-tree
└── HelloModule/      ← HelloModule plugin-tree
    ├── class/        ← Reserved for compilation (do not modify)
    ├── data/         ← For your resources (images, audio, etc.)
    ├── includes/     ← For files to be included in programs
    ├── lib/          ← For the possible Java libraries
    ├── src/          ← For the Java sources of your plugin
    ├── templates/    ← For possible templates and exercises
    ├── build.sh      ← Bash script for compilation and packaging
    └── build.bat     ← DOS script for compilation and packaging
Explore HelloModule. The src directory contains in particular the two Java files YourModule.java and YourToolbar.java to be renamed and which will be used as a basis for the development of your module:
HelloModule/
├── lib/
│   └── codelab.jar                     ← Reserved for compilation (do not delete)
├── src/
│   └── codelab/
│       └── modules/
│           └── yourmodule/             ← Rename to "hellomodule"
│               ├── YourModule.java     ← Rename to "HelloModule.java"
│               └── YourToolbar.java    ← Rename to "HelloToolbar.java"
├── data/
│   ├── icon_clear.png                  ← An icon for a button
│   └── icon_hello.png                  ← Another icon
├── includes/
│   └── api.dtd                         ← Reserved for compilation (do not delete)
├── templates/
After duplicating the template-tree, you have renamed it as follows:
- The main directory
YourModulehas becomeHelloModule - The terminal package
yourmodulehas becomehellomodule - The class
YourModule.javahas becomeHelloModule.java - The class
YourToolbar.javahas becomeHelloToolbar.java
The HelloToolbar.java class will not be used at first.
2. Main classes of the module
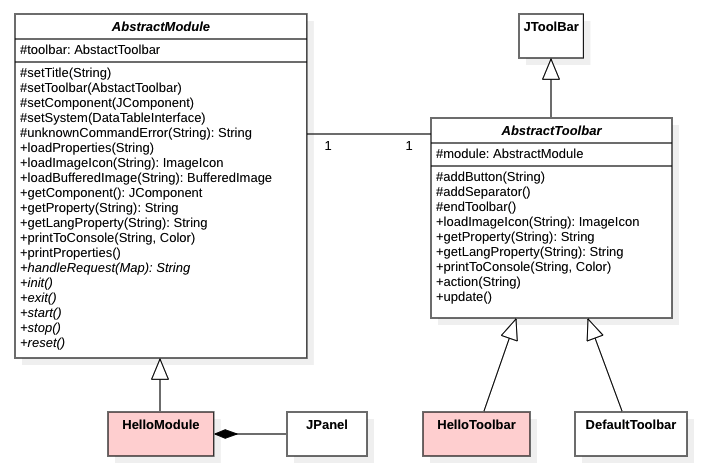
The design of a plugin must respect the following object model, with the two superclasses AbstractModule and AbstractToolbar ensuring the integration of the plugin into the CodeLab architecture. The inherited class HelloModule will consist of a JPanel in charge of the view. As we don't add specific buttons to the toolbar at first, the DefaultToolbar class will be used implicitly:
Let's start by defining the HelloModule class as follows:
package codelab.modules.hellomodule;

import codelab.AbstractModule;
import codelab.CodeLab;
import java.util.Map;
import javax.swing.JPanel;

public class HelloModule extends AbstractModule {

    ///////////////////////////////////////////////////
    // Constructor
    ///////////////////////////////////////////////////

    public HelloModule(CodeLab codelab) {
        super(codelab);
        setTitle("Hello Lab");
        setComponent(new JPanel());
    }

    ///////////////////////////////////////////////////
    // Abstract methods to implement (or not)
    ///////////////////////////////////////////////////

    public void init() {
    }
    public void exit() {
    }
    public void start() {
    }
    public void stop() {
    }
    public void reset() {
    }

    ///////////////////////////////////////////////////
    // Instruction handler
    ///////////////////////////////////////////////////

    public String handleRequest(Map<String, String> params) {
        String cmd = params.get("cmd");
        switch (cmd) {
            case "cmd1": return "Value to return";
            case "cmd2": return "Value to return";
            default: return unknownCommandError(cmd);
        }
    }
}
You can already generate your plugin to verify that it appears as a new tab in CodeLab. To do this, run the build.sh script and check that a HelloModule.jar file has been placed in the modules directory of CodeLab. Start CodeLab and notice that you have a new tab called Hello Lab but nothing more.
Here is the content of a terminal after the execution of the build.bat script (under Windows) or build.sh (under OSX or Linux) when everything has gone well:

3. Business methods of the main class
We are now going to complete the HelloModule class by adding the methods that will answer the purpose of our module (display a text in the JPanel):
- An
int setText(String str)method to display a string - An
int setFont(String name, int size)method to set the font and its size
Note that these methods return an integer. This is not mandatory but it helps to remember that it is always possible to return a value. The final rendering will be done by a simple JLabel instantiated and added to the JPanel inside the constructor. Here are the modifications made to the HelloModule class (add the necessary awt and Swing imports):
public class HelloModule extends AbstractModule {

    private JPanel panel;
    private JLabel label;

    ///////////////////////////////////////////////////
    // Constructor
    ///////////////////////////////////////////////////

    public HelloModule(CodeLab codelab) {
        super(codelab);
        setTitle("Hello Lab");
        setComponent(panel = new JPanel());
        panel.setLayout(new GridBagLayout());
        panel.add(label = new JLabel());
    }

    ///////////////////////////////////////////////////
    // Public methods
    ///////////////////////////////////////////////////

    public int setText(String str) {
        label.setText(str);
        return 1; // No error
    }

    public int setFont(String name, int size) {
        label.setFont(new Font(name, 1, size));
        return 1; // No error
    }
4. Writing the instruction handler
The HelloModule class includes an instruction handler that receives instructions from future programs written in C, Java, Python, etc. This handler is implemented by the handleRequest method which receives an instruction in the form of a Map<String, String> dictionary and returns a string. The dictionary contains the instruction and its parameters. The switch-case structure will, for each instruction to be implemented, extract the parameters, cast them to the expected types, invoke the correct method, and return a result in the form of a string:
public String handleRequest(Map<String, String> params) {
    String cmd = params.get("cmd");
    switch (cmd) {
        case "cmd1": return "Value to return";
        case "cmd2": return "Value to return";
        default: return unknownCommandError(cmd);
    }
}
Here is the HelloModule handler completed with the setText and setFont instructions:
public String handleRequest(Map<String, String> params) {
    String cmd = params.get("cmd");
    switch (cmd) {

        case "setText":
            String str = params.get("str");
            return String.valueOf(setText(str));

        case "setFont":
            String name = params.get("name");
            int size = Integer.valueOf(params.get("size"));
            return String.valueOf(setFont(name, size));

        default:
            return unknownCommandError(cmd);
    }
}
5. Writing the "includes" for each target language
This essential step consists in generating the files to be included for each target language. These files are the interface between a programming language and the CodeLab environment (Application Programming Interface). The generation of these files will be done automatically from XML documents which include (in this order):
- Constant elements (name + type + value)
- Instruction elements (protoypes of instructions)
- Include elements (code to be inserted directly)
This last section allows to place in the include files definitions that go beyond the framework imposed by the instruction grammar. The DTD is as follows:
<!ELEMENT api (constant*, instruction*, include*)>

<!ELEMENT constant EMPTY>
<!ATTLIST constant name CDATA #REQUIRED>
<!ATTLIST constant type (int|float|string) #REQUIRED>
<!ATTLIST constant value CDATA #REQUIRED>

<!ELEMENT instruction (arg*)>
<!ATTLIST instruction name CDATA #REQUIRED>
<!ATTLIST instruction type (int|float|string) #REQUIRED>

<!ELEMENT arg EMPTY>
<!ATTLIST arg name CDATA #REQUIRED>
<!ATTLIST arg type (int|float|string) #REQUIRED>

<!ELEMENT include (#PCDATA)>
<!ATTLIST include lang (c|java|python) #REQUIRED>
The choice of the name of this file is important because it determines the names of the files to be included. For example, if we name this file hello.xml, running the build script will handle the files hello.c, hello.py and Hello.java. Write the following XML document and place it in the includes directory:
<?xml version='1.0' encoding='UTF-8'?>
<!DOCTYPE api SYSTEM 'api.dtd'>
<api module='HelloModule'>

    <instruction name='setText' type='int'>
        <arg name='str' type='string'/>
    </instruction>

    <instruction name='setFont' type='int'>
        <arg name='name' type='string'/>
        <arg name='size' type='int'/>
    </instruction>

</api>
Generate your plugin again by running the build script and look at the generated files in the includes directory. For example, let's look at the hello.py file generated for the Python language:
SETTEXT_CMD = 'module=HelloModule&cmd=setText&str=%s'
SETFONT_CMD = 'module=HelloModule&cmd=setFont&name=%s&size=%d'

def setText(str):
    buffer = SETTEXT_CMD % str
    return int(request(buffer))

def setFont(name, size):
    buffer = SETFONT_CMD % (name, size)
    return int(request(buffer))
Whatever the target language, these files are built in the same way and contain:
- A set of formatting strings (one per instruction)
- One function (or method) per instruction to be implemented
- Maybe constants and utility functions
The formatting strings are built on the model of HTTP GET requests, or requests to a socket-server: module=...&cmd=...&arg1=...&arg2=...&etc.. Each implemented statement will have to insert the actual parameters in the string and send the latter to CodeLab via the request function.
6. Writing four templates
This optional step consists in designing and adding templates (or exercises) to the module, that will be proposed in the CodeLab environment when adding new programs.
Example of "growing.py" template for the Python language:
from HelloModule.hello import *

## Program _fileName_
## Created by _author_ on _date_

setText('Hello World!')
for size in range(0, 50):
    setFont('Times new Roman', size)
Example of "growing.c" template for the C language:
#include "HelloModule/hello.c"

/*
 * Program _fileName_
 * Created by _author_ on _date_
 */

int main() {
    setText("Hello World!");
    for (int size = 0; size < 50; size++)
        setFont("Times new Roman", size);
    return 0;
}
Example of "growing.java" template for the Java language:
import HelloModule.Hello;

/*
 * Class _className_
 * Created by _author_ on _date_
 */

class _className_ extends Hello {

    private void run() {
        setText("Hello World!");
        for (int size = 0; size < 50; size++)
            setFont("Times new Roman", size);
    }

    public static void main(String args[]) {
        new _className_().run();
    }
}
Example of "growing.clp" template for the CLIPS language:
#requires HelloModule/hello

;; Program _fileName_
;; Created by _author_ on _date_

(defrule only-rule
    =>
    (setText "Hello World!")
    (loop-for-count (?size 0 50)
        (setFont "Times new Roman" ?size)))
Put these files in the templates directory of your tree, and check that it matches the following, before generating your module again:
HelloModule/
├── data/
│   ├── icon_clear.png
│   └── icon_hello.png
├── lib/
│   └── codelab.jar
├── src/
│   └── codelab/
│       └── modules/
│           └── hellomodule/
│               ├── HelloModule.java
│               └── HelloToolbar.java
├── includes/
│   ├── api.dtd
│   ├── hello.c
│   ├── hello.clp
│   ├── Hello.java
│   ├── hello.py
│   └── hello.xml
├── templates/
│   ├── growing.c
│   ├── growing.clp
│   ├── growing.java
│   └── growing.py
├── build.bat
└── build.sh
Generate your plugin again, run CodeLab and test your module...
7. Adding buttons to the toolbar
You will now customize your toolbar by adding Hello and Clear buttons to it:

Start by instantiating a HelloToolbar in the HelloModule constructor, as follows:
public HelloModule(CodeLab codelab) {
    super(codelab);
    setTitle("Hello Lab");
    setToolbar(new HelloToolbar(this));
    setComponent(panel = new JPanel());
    panel.setLayout(new GridBagLayout());
    panel.add(label = new JLabel());
}
You can already test your modified module, and you will see a new Hello button that just displays an orange "Hello World!" in the CodeLab console. Look at the ToolButton parameters in the HelloToolbar constructor:
"HELLO": the identifier of the button/action to execute"Hello": the text displayed under the button"Say Hello World": the text of the tooltipicon_hello: the button iconthis: the button bar itself
Also look at the HelloToolbar's action manager and its action_hello method invoked by the manager. Modify this method to display the "Hello World!" not in the console, but in the JPanel of the module:
private void action_hello() {
    ((HelloModule) module).setFont("Times", 50);
    ((HelloModule) module).setText("Hello World!");
}
Then, based on the Hello button, add a Clear button that should clear the contents of the JPanel. This involves modifying the constructor, the action handler and writing an action method action_clear:
public class HelloToolbar extends AbstractToolbar {

    private ImageIcon icon_hello = loadImageIcon("icon_hello.png");
    private ImageIcon icon_clear = loadImageIcon("icon_clear.png");

    public HelloToolbar(HelloModule module) {
        super(module);
        addSeparator();
        add(new ToolButton("HELLO", "Hello", "Say Hello World", icon_hello, this));
        add(new ToolButton("CLEAR", "Clear", "Clear the panel", icon_clear, this));
        endToolbar();
    }

    public void action(String ident) {
        switch (ident) {
            case "HELLO": action_hello(); break;
            case "CLEAR": action_clear(); break;
            default: super.action(ident);
        }
    }

    private void action_hello() {
        ((HelloModule) module).setFont("Times", 50);
        ((HelloModule) module).setText("Hello World!");
    }

    private void action_clear() {
        ((HelloModule) module).clear();
    }
}
That's not all: don't forget to write the clear method of the HelloModule:
public int clear() {
    panel.removeAll();
    panel.add(label = new JLabel());
    panel.repaint();
    return 1;
}
You can also add a new clear() statement to the module's API by completing the hello.xml file and the statement handler.
8. Internationalization of the module
Start by adding a lang.properties file in the data folder and copy the following lines into it:
title_fr = Bonjour Lab
title_en = Hello Lab

btn_hello_fr = Bonjour
btn_hello_en = Hello

btn_hello_tooltip_fr = Dire Bonjour
btn_hello_tooltip_en = Say Hello World

btn_clear_fr = Effacer
btn_clear_en = Clear

btn_clear_tooltip_fr = Effacer le panel
btn_clear_tooltip_en = Clear the panel
The AbstractModule and AbstractToolbar classes both contain getProperty(String key) and getLangProperty(String key) methods which look for a string from a key in property files. The particularity of the second method is to add the suffix that corresponds to the language specified by the LANG entry in the CodeLab userconfig/user.properties file. Thus, if LANG=en then the title entry becomes title_en.
Load this file at the beginning of the HelloModule constructor and use this facility in the setTitle:
public HelloModule(CodeLab codelab) {
    super(codelab);
    loadProperties("lang.properties");
    setTitle(getLangProperty("title"));
    setToolbar(new HelloToolbar(this));
    setComponent(panel = new JPanel());
    panel.setLayout(new GridBagLayout());
    panel.add(label = new JLabel());
}
Finally, modify the HelloToolbar constructor as follows:
public HelloToolbar(HelloModule module) {
    super(module);
    addSeparator();

    add(new ToolButton("HELLO",
        getLangProperty("btn_hello"),
        getLangProperty("btn_hello_tooltip"), icon_hello, this));

    add(new ToolButton("CLEAR",
        getLangProperty("btn_clear"),
        getLangProperty("btn_clear_tooltip"), icon_clear, this));

    endToolbar();
}
This tutorial is over. You can continue to explore CodeLab plugin development by completing the next tutorials.
 Document under Creative Commons License CC-BY-NC-ND
Copyright © 2021 Jérôme Lehuen, Le Mans Université, France
 Version 25-04-2021