CodeLab Tutorial #2
Designing a 2D plotter module
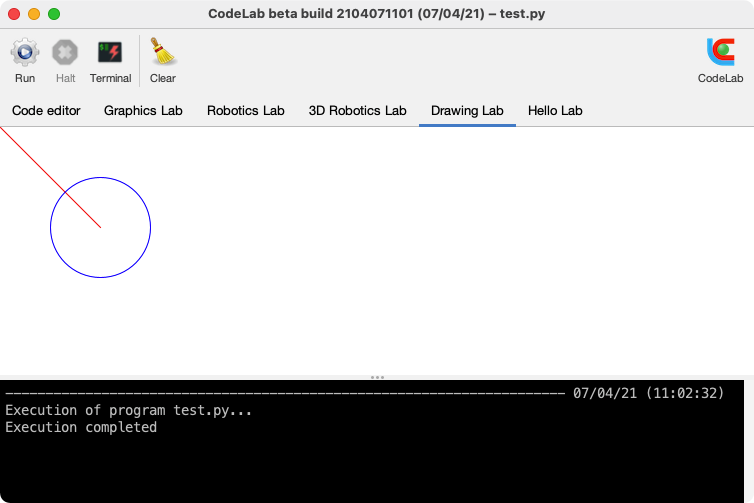
By following this tutorial, you will realize the plugin "DrawingModule" which allows to realize simple 2D plots, with any of the languages included in CodeLab. The rendering below is the result of the execution of the following Python program:
from DrawingModule.canvas import *

clearScreen()
setColor(COLOR_RED)
drawLine(0, 0, 100, 100)
setColor(COLOR_BLUE)
drawCircle(100, 100, 50)
The main difference between this module and the first one in tutorial #1 is the realization of the graphic rendering panel. The other aspects of the design are very similar and will not be as detailed as in the first tutorial. It is therefore necessary to have completed the first tutorial before moving on to this one.
Prerequisites for this tutorial:
- Having followed the first tutorial
- Mastering the object concepts and the OOP in Java
- Knowing the Java awt and Swing APIs
- Understanding the syntax of XML files
Table of Contents:
- Development tree
- Main classes of the module
- Definition of the DrawingPanel class
- Definition of the module API
- [Definition of the toolbar] (#5)
- [Module generation] (#6)
1. Development tree
As in the first tutorial, go to the plugins directory and duplicate the YourModule model tree and rename it to DrawingModule. Also rename the main package and the main classes. After these renamings, you should have the following tree structure:
DrawingModule/                                ← Renamed folder
├── class/
├── data/
│   ├── icon_clear.png
│   └── icon_hello.png
├── includes/
│   └── api.dtd
├── lib/
│   └── codelab.jar
├── src/
│   └── codelab/
│       └── modules/
│           └── drawingmodule/                ← Renamed package
│               ├── DrawingModule.java        ← Renamed class
│               └── DrawingToolbar.java       ← Renamed class
├── templates/
├── build.bat
└── build.sh
2. Main classes of the module
The object model of the DrawingModule is of course similar to that of the HelloModule. We will in particular use a DrawingToolbar with only one extra button to erase the drawings. See the previous tutorial if you have any doubts about the justification of these classes. The three classes you will define are in red on the following diagram:

Start by defining the DrawingModule class as below. The statements that the statement handler (handleRequest) will need to take into account are the following:
clearScreen()to clear the graphic screensetColor(color)to define the color of future drawingsdrawLine(x1, y1, x2, y2)to draw a segment between 2 pointsdrawCircle(x, y, r)to draw a circle with center (x, y) and radius r
Notice that all of these statements correspond to public methods of the DrawingPanel class (which hasn't been defined yet) that you can see in the class diagram.
Below is the code for the DrawingModule class:
package codelab.modules.drawingmodule;

import java.awt.Color;
import java.awt.Graphics;
import java.awt.Graphics2D;
import java.awt.RenderingHints;
import java.awt.image.BufferedImage;
import javax.swing.JPanel;
import javax.swing.ImageIcon;

public class DrawingPanel extends JPanel {

    private static final int WIDTH = 2000;
    private static final int HEIGHT = 1500;
    private static final int TYPE = BufferedImage.TYPE_INT_ARGB;

    private BufferedImage image;
    private Graphics2D g2d;

    ///////////////////////////////////////////////////
    // Constructor
    ///////////////////////////////////////////////////

    public DrawingPanel() {
        image = new BufferedImage(WIDTH, HEIGHT, TYPE);
        g2d = getGraphics2D(image);
        clearScreen();
    }

    ///////////////////////////////////////////////////
    // Component's paintComponent method
    ///////////////////////////////////////////////////

    protected void paintComponent(Graphics g) {
        super.paintComponent(g);
        g.drawImage(image, 0, 0, null);
    }

    ///////////////////////////////////////////////////
    // Public methods
    ///////////////////////////////////////////////////

    public int drawLine(int x1, int y1, int x2, int y2) {
        g2d.drawLine(x1, y1, x2, y2);
        repaint();
        return 1;
    }

    public int drawCircle(int x, int y, int r) {
        g2d.drawOval(x-r, y-r, 2*r, 2*r);
        repaint();
        return 1;
    }

    public int setColor(int code) {
        switch (code) {
            case 0: g2d.setColor(Color.BLACK); return 1;
            case 1: g2d.setColor(Color.WHITE); return 1;
            case 2: g2d.setColor(Color.GREEN); return 1;
            case 3: g2d.setColor(Color.BLUE); return 1;
            case 4: g2d.setColor(Color.RED); return 1;
            default: return 0;
        }
    }

    public int clearScreen() {
        g2d.setBackground(Color.WHITE);
        g2d.clearRect(0, 0, WIDTH, HEIGHT);
        repaint();
        return 1;
    }

    ///////////////////////////////////////////////////
    // Private methods
    ///////////////////////////////////////////////////

    private Graphics2D getGraphics2D(BufferedImage image) {
        Graphics2D g2d = image.createGraphics();
        g2d.setRenderingHint(
            RenderingHints.KEY_ANTIALIASING,
            RenderingHints.VALUE_ANTIALIAS_ON);
        return g2d;
    }
}
3. Definition of the DrawingPanel class
We will now write the DrawingPanel which is responsible for making the drawings. This tutorial is not intended to explain the Java awt and Swing APIs (graphics classes, component placement, etc.), as these classes are widely discussed on the web.
Below is the code for the DrawingPanel class:
package codelab.modules.drawingmodule;

import java.awt.Color;
import java.awt.FlowLayout;
import java.awt.Graphics2D;
import java.awt.RenderingHints;
import java.awt.image.BufferedImage;

import javax.swing.JPanel;
import javax.swing.JLabel;
import javax.swing.ImageIcon;

public class DrawingPanel extends JPanel {

    private static final int WIDTH = 2000;
    private static final int HEIGHT = 1500;
    private static final int TYPE = BufferedImage.TYPE_INT_ARGB;

    private Graphics2D g2d;

    ///////////////////////////////////////////////////
    // Constructor
    ///////////////////////////////////////////////////

    public DrawingPanel() {
        BufferedImage image = new BufferedImage(WIDTH, HEIGHT, TYPE);
        setLayout(new FlowLayout(FlowLayout.LEFT, 0, 0));
        add(new JLabel(new ImageIcon(image)));
        g2d = getGraphics2D(image);
        clearScreen();
    }

    ///////////////////////////////////////////////////
    // Public methods
    ///////////////////////////////////////////////////

    public int drawLine(int x1, int y1, int x2, int y2) {
        g2d.drawLine(x1, y1, x2, y2);
        repaint();
        return 1;
    }

    public int drawCircle(int x, int y, int r) {
        g2d.drawOval(x-r, y-r, 2*r, 2*r);
        repaint();
        return 1;
    }

    public int setColor(int code) {
        switch (code) {
            case 0: g2d.setColor(Color.BLACK); return 1;
            case 1: g2d.setColor(Color.WHITE); return 1;
            case 2: g2d.setColor(Color.GREEN); return 1;
            case 3: g2d.setColor(Color.BLUE); return 1;
            case 4: g2d.setColor(Color.RED); return 1;
            default: return 0;
        }
    }

    public int clearScreen() {
        g2d.setBackground(Color.WHITE);
        g2d.clearRect(0, 0, WIDTH, HEIGHT);
        repaint();
        return 1;
    }

    ///////////////////////////////////////////////////
    // Private method
    ///////////////////////////////////////////////////

    private Graphics2D getGraphics2D(BufferedImage image) {
        Graphics2D g2d = image.createGraphics();
        g2d.setRenderingHint(
            RenderingHints.KEY_ANTIALIASING,
            RenderingHints.VALUE_ANTIALIAS_ON);
        return g2d;
    }
}
4. Definition of the module API
The consistency of our module relies on a good correspondence between:
- The instruction handler of the
DrawingModuleclass - The public methods of the
DrawingPanelclass - The definitions in the XML file describing the module API
These definitions allow to generate the files to be included for each target language. Remember that the name of this file is important because it determines the names of the files to be included. Write the following XML document in a canvas.xml file and place it in the includes directory:
<?xml version='1.0' encoding='UTF-8'?>
<!DOCTYPE api SYSTEM 'api.dtd'>
<api module='DrawingModule'>

    <!-- Constants section -->

    <constant name='COLOR_BLACK' type='int' value='0'/>
    <constant name='COLOR_WHITE' type='int' value='1'/>
    <constant name='COLOR_GREEN' type='int' value='2'/>
    <constant name='COLOR_BLUE' type='int' value='3'/>
    <constant name='COLOR_RED' type='int' value='4'/>

    <!-- Instructions section -->

    <instruction name='clearScreen' type='int'/>

    <instruction name='setColor' type='int'>
        <arg name='color' type='int'/>
    </instruction>

    <instruction name='drawLine' type='int'>
        <arg name='x1' type='int'/>
        <arg name='y1' type='int'/>
        <arg name='x2' type='int'/>
        <arg name='y2' type='int'/>
    </instruction>

    <instruction name='drawCircle' type='int'>
        <arg name='x' type='int'/>
        <arg name='y' type='int'/>
        <arg name='r' type='int'/>
    </instruction>
</api>
5. Definition of the toolbar
Writing the toolbar is very simple since everything was already written in the YourModule.java file which served as a template for DrawingModule.java. We just need to make some adaptations (icon, text, tooltip, etc.) in order to have a working Clear button instead of the Hello button:
package codelab.modules.drawingmodule;

import codelab.AbstractToolbar;
import codelab.ToolButton;
import javax.swing.ImageIcon;

public class DrawingToolbar extends AbstractToolbar {

    private ImageIcon icon_clear = loadImageIcon("icon_clear.png");

    ///////////////////////////////////////////////////
    // Constructor
    ///////////////////////////////////////////////////

    public DrawingToolbar(DrawingModule module) {
        super(module);
        addSeparator();
        add(new ToolButton("CLEAR", "Clear", "Clear the canvas", icon_clear, this));
        endToolbar();
    }

    ///////////////////////////////////////////////////
    // Action handler
    ///////////////////////////////////////////////////

    public void action(String ident) {
        switch (ident) {
            case "CLEAR": action_clear(); break;
            default: super.action(ident);
        }
    }

    private void action_clear() {
        DrawingPanel canvas = (DrawingPanel) module.getComponent();
        canvas.clearScreen();
    }
}
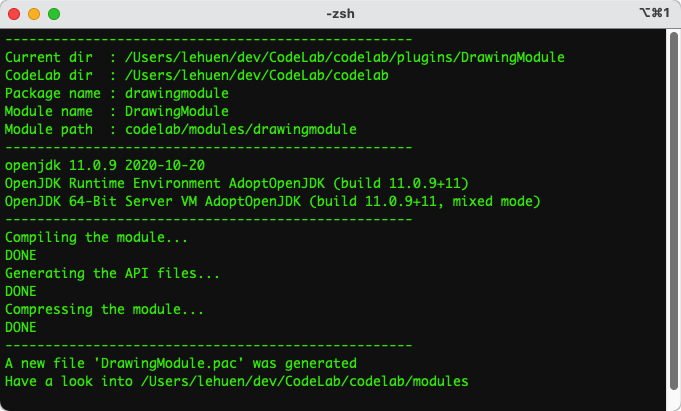
6. Generating the module
The module is now ready to be generated. Before that, you may want to define templates, exercises and even internationalize your module, as explained in the previous tutorial.
To generate the module, run the build script, which will place a DrawingModule.pac file in the module folder of CodeLab:
This second tutorial is over. You can continue to explore CodeLab plugin development by completing the next tutorials.
 Document under Creative Commons License CC-BY-NC-ND
Copyright © 2021 Jérôme Lehuen, Le Mans Université, France
 Version 25-04-2021